Battery switch on travel trailer function is crucial for managing your RV’s power. Understanding how to use your battery switch – whether it’s a single, dual, or rotary model – is essential for safe and efficient power management. This guide breaks down the intricacies of travel trailer battery switches, covering everything from basic operation to advanced troubleshooting and maintenance.
We’ll explore the different types of switches, how to connect and disconnect your batteries safely, and how to diagnose and fix common problems. We’ll also delve into the interaction between your battery switch and other electrical components, ensuring you’re equipped to handle any power situation on the road. Get ready to become a battery switch expert!
Understanding Battery Switch Functionality in Travel Trailers
Your travel trailer’s battery switch is a crucial component, acting as the central control for your trailer’s battery power. Understanding its function and operation is essential for safe and efficient use of your RV. A properly functioning battery switch protects your batteries, prevents accidental drain, and allows you to easily manage power to different systems in your trailer.
Battery Switch Purposes
The primary purpose of a battery switch is to disconnect or connect your trailer’s battery (or batteries) from the rest of the electrical system. This prevents unwanted battery drain when your trailer is not in use, protecting your battery’s lifespan and ensuring you have power when you need it. It also allows you to selectively power different systems, like the interior lights or water pump, without running everything at once.
Types of Battery Switches
Several types of battery switches exist, each offering different levels of control. A single battery switch is the simplest, offering a single ON/OFF function for one battery. Dual battery switches manage two batteries, allowing you to switch between them or combine their power. Rotary switches offer several positions, enabling you to select different combinations of battery power and even isolate batteries completely.
Some more advanced switches include features like an auxiliary position to allow charging even when the main switch is off.
Internal Workings of a Battery Switch
A typical battery switch uses a robust mechanical system, often involving heavy-duty contacts and a durable switching mechanism. When you turn the switch, it physically connects or disconnects the battery terminals, completing or interrupting the electrical circuit. The design is intended to withstand the high currents associated with trailer batteries and various loads. Higher-end switches might incorporate additional features, like overload protection or indicator lights to show the switch’s status.
Operating a Battery Switch: A Step-by-Step Guide
Before operating your battery switch, always refer to your trailer’s owner’s manual for specific instructions. Generally, the process is straightforward:
- Locate your battery switch. It’s usually located near the battery compartment or inside a convenient access panel.
- Identify the switch positions. Common positions include “OFF,” “BATTERY 1,” “BATTERY 2,” “BOTH,” and sometimes an “AUX” position. Consult your manual to confirm the positions on your switch.
- To completely disconnect your batteries, turn the switch to the “OFF” position. This prevents any drain on your batteries.
- To use one battery, select either “BATTERY 1” or “BATTERY 2,” depending on which battery you want to power your system.
- To combine the power from both batteries, select the “BOTH” position. This is typically used when you need more power for appliances like an air conditioner or microwave.
- Some switches have an “AUX” position. This allows charging of one or both batteries while keeping the main system disconnected.
- After using the trailer, always switch to the “OFF” position to conserve battery power.
Troubleshooting Common Battery Switch Issues

Your travel trailer’s battery switch is a crucial component, ensuring you can seamlessly switch between your tow vehicle’s charging system and your trailer’s house batteries. Problems with this switch can leave you stranded without power. Understanding common issues and how to diagnose and fix them is essential for maintaining your RV’s functionality.Troubleshooting a malfunctioning battery switch often involves a systematic approach, checking for simple problems before moving to more complex repairs.
This process usually begins with a visual inspection and progresses to testing the electrical connections and the switch itself. Remember safety first – always disconnect the negative battery terminal before working on any electrical components.
Identifying Common Problems
Common problems with battery switches stem from corrosion, loose connections, and internal switch failure. Corrosion builds up over time, especially in damp environments, hindering the flow of electricity. Loose connections, often caused by vibration during travel, create intermittent power or complete power loss. Internal switch failure can manifest as a complete inability to switch power, or a situation where the switch seems stuck in one position.
These issues can manifest as flickering lights, non-functioning appliances, or a complete lack of power in your RV. Regular inspection can prevent these problems from becoming major headaches.
Diagnosing a Malfunctioning Battery Switch
Diagnosing a battery switch problem requires a methodical approach. Begin by visually inspecting the switch and its connections for signs of corrosion or looseness. Look for any green or white powdery residue around the terminals – this is a clear sign of corrosion. Check that all wires are securely connected and that the terminals are clean and tight.
If the visual inspection reveals nothing obvious, you’ll need to use a multimeter to test the voltage and continuity. With the battery switch in each position (off, battery 1, battery 2, both), measure the voltage at the battery terminals and at the output of the switch. A significant voltage drop or a lack of continuity indicates a problem within the switch or its wiring.
So, you’re planning a trip? Awesome! Don’t forget travel insurance! Check out Aon travel insurance for comprehensive coverage. They’ve got options for everything from lost luggage to medical emergencies. Speaking of which, another great resource for comparing plans is Aon travel insurance ; they often have different deals and packages available depending on your needs.
Get a quote today and travel worry-free!
Repairing or Replacing a Faulty Battery Switch
If your diagnosis points to a faulty battery switch, repair or replacement is necessary. If the problem is simple corrosion, cleaning the terminals with a wire brush and applying a corrosion inhibitor might suffice. For loose connections, tightening the screws and ensuring a firm connection will often solve the issue. However, if the switch itself is faulty (indicated by a multimeter test showing no continuity or a significant voltage drop), replacement is the best course of action.
Replacing the switch involves disconnecting the battery’s negative terminal, removing the old switch, and installing a new one, ensuring all connections are secure and corrosion-free. Always consult your RV’s wiring diagram to correctly identify the wires before disconnecting them.
Troubleshooting Flowchart, Battery switch on travel trailer function
Before starting any repairs, always disconnect the negative battery terminal.
- Visual Inspection: Check for corrosion and loose connections at the switch and battery terminals.
- If corrosion is present: Clean terminals with a wire brush and apply corrosion inhibitor. Retest.
- If connections are loose: Tighten connections securely. Retest.
- If the problem persists: Use a multimeter to test voltage and continuity at the switch in each position (off, battery 1, battery 2, both).
- If multimeter tests reveal a faulty switch: Replace the battery switch. Ensure all connections are clean and tight. Retest.
- If the problem still exists after replacement: Check for issues with the wiring leading to and from the switch. Consult a qualified RV technician.
Battery Switch and Electrical System Integration
The battery switch is the central control point for your travel trailer’s power, acting as a gatekeeper between your house batteries and the rest of the electrical system. Understanding its interaction with other components is crucial for safe and efficient operation. This section will explore how the switch interacts with key electrical elements like the converter and inverter, and compare different switch configurations.Your battery switch doesn’t operate in isolation; it’s a key player in a larger electrical ecosystem.
It directly influences the flow of power from your house batteries to various systems within your trailer. The converter, for instance, relies on the battery switch to access the battery power needed to charge the trailer’s 12-volt system and potentially convert 12V DC to 120V AC. Similarly, an inverter will draw power from your batteries (via the switch) to create 120V AC power for appliances that require it.
A faulty switch can lead to power loss to these crucial components, rendering your trailer’s systems inoperable.
Battery Switch Configurations: Advantages and Disadvantages
Different types of battery switches offer varying levels of control and complexity. Common configurations include single switches, dual switches (allowing selection between battery banks or shore power), and switches with a “both” or “off” position. Each offers unique advantages and disadvantages depending on your needs.
So, you’re planning a trip? Awesome! Don’t forget travel insurance! Check out Aon travel insurance for options covering everything from lost luggage to medical emergencies. Seriously, it’s a lifesaver. And if you’re traveling with a group, consider comparing their plans with Aon travel insurance – they might have specific deals for larger parties.
Getting insured is just smart planning, right?
| Switch Type | Advantages | Disadvantages |
|---|---|---|
| Single Battery Switch | Simple, inexpensive, easy to install. | Limited control; only allows connection of one battery bank at a time. |
| Dual Battery Switch | Allows selection between two battery banks or shore power; offers more flexibility. | Slightly more complex than a single switch; may be more expensive. |
| Switch with “Both” and “Off” Positions | Provides the ability to combine both battery banks for increased power output or to completely isolate the batteries. | More complex and potentially more expensive than simpler switches. Improper use of the “both” position can lead to overloads. |
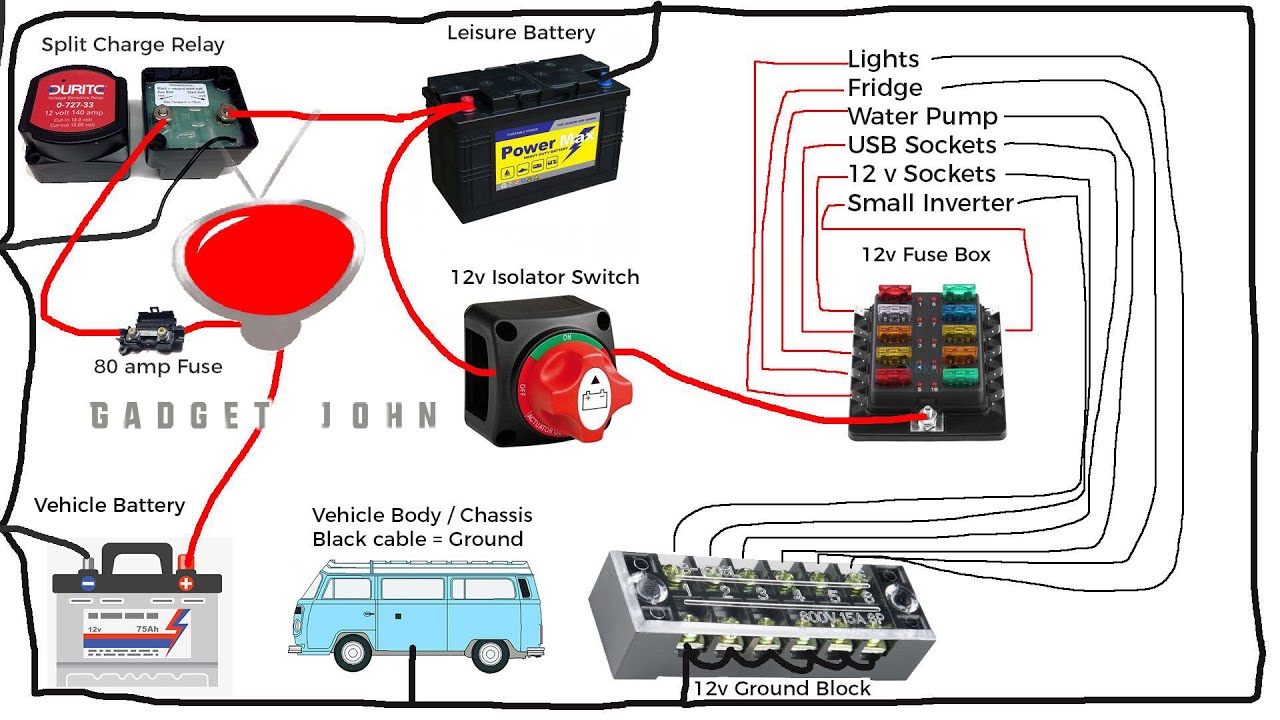
Typical Travel Trailer Electrical System Diagram
The following diagram illustrates a simplified representation of how electricity flows through a typical travel trailer’s electrical system. Remember, this is a simplified representation and the actual wiring in your trailer might vary slightly.
| Component | Description | Diagram Representation |
|---|---|---|
| Shore Power Inlet | Connects to external power source (campground hookup). | (Image: A simple drawing of a power cord plugging into a wall socket) |
| Battery Switch | Controls power flow from house batteries to the rest of the system. | (Image: A simple drawing of a switch with three positions: Battery 1, Battery 2, and Off) |
| House Batteries | 12V DC power source for the trailer. | (Image: A simple drawing of two battery icons) |
| Converter | Converts 12V DC to 120V AC. | (Image: A simple drawing of a box labeled “Converter” with an arrow showing DC in and AC out) |
| Inverter | Converts 12V DC to 120V AC (usually for higher-power demands). | (Image: A simple drawing of a box labeled “Inverter” with an arrow showing DC in and AC out) |
| 12V DC Circuits | Power various 12V DC appliances (lights, fans). | (Image: A simple drawing of several wires leading to lightbulb and fan icons) |
| 120V AC Circuits | Power various 120V AC appliances (air conditioner, microwave). | (Image: A simple drawing of several wires leading to air conditioner and microwave icons) |
Maintaining Your Battery Switch and Batteries
Keeping your travel trailer’s battery system in top shape is crucial for reliable power on the road. Regular maintenance of both your batteries and the battery switch itself will significantly extend their lifespan and prevent frustrating breakdowns. This involves a proactive approach, combining scheduled checks with preventative measures.
Battery and Battery Switch Maintenance Schedule
A regular maintenance schedule will help you catch potential problems early. Here’s a suggested plan:
Monthly: Visually inspect battery terminals for corrosion, check the battery switch operation (both positions), and ensure all connections are tight.
Quarterly: Clean battery terminals and connections thoroughly. Check battery voltage using a multimeter.
Annually: Have your batteries professionally tested for capacity and overall health. Consider replacing batteries every 3-5 years depending on usage and type. Inspect the battery switch for any signs of damage or wear.
Extending Battery Lifespan
Proper care significantly impacts battery longevity. Here are some tips:
Keep batteries clean and dry. Corrosion is a major enemy of battery life.
Store batteries in a cool, dry place when not in use. Extreme temperatures drastically reduce battery lifespan. For example, storing your batteries in a hot attic during summer will significantly degrade their capacity over time.
Avoid deep discharging your batteries. Deep discharges put considerable stress on the batteries and shorten their life. Consider using a battery monitor to track your battery’s state of charge.
Equalize flooded lead-acid batteries periodically (if applicable). This process helps to balance the charge across all cells, improving overall performance and lifespan. Consult your battery’s manual for specific instructions.
Cleaning Battery Terminals and Connections
Dirty terminals lead to poor connections and reduced performance. Here’s how to clean them:
1. Disconnect the negative (-) terminal first, then the positive (+). This prevents accidental short circuits.
- Use a wire brush or terminal cleaner to remove corrosion from both the terminals and the posts. Baking soda paste mixed with water can also be effective for removing corrosion.
- After cleaning, apply a thin layer of anti-corrosion grease to the terminals to prevent future corrosion.
- Reconnect the positive (+) terminal first, then the negative (-).
Testing Battery Voltage and Amperage
A multimeter is an invaluable tool for assessing battery health. Here’s how to test voltage and amperage:
To test voltage: Set your multimeter to DC voltage (usually represented by a symbol like “V—“). Connect the red lead to the positive (+) terminal and the black lead to the negative (-) terminal. A fully charged 12V battery should read around 12.6-13.2 volts. Lower readings indicate a low state of charge. For example, a reading of 11.8 volts indicates a battery that needs charging.
To test amperage: This requires a slightly more advanced technique, often involving a load test. Set your multimeter to DC amperage (usually represented by “A”). You will need to connect the multimeter in series with the battery and a known load (such as a headlight). The amperage reading will indicate the battery’s ability to deliver current under load. This is best done by a professional if you are unsure.
Safety Considerations: Battery Switch On Travel Trailer Function
Working with batteries and electrical systems in your travel trailer demands careful attention to safety. Incorrect usage can lead to serious injury or damage to your equipment. Understanding and following safe practices is crucial for a worry-free RV experience.Proper handling of your battery switch and related components is paramount to prevent accidents. Ignoring safety precautions can result in dangerous situations, so let’s review some key safety measures.
Potential Hazards of Incorrect Battery Switch Usage
Improperly using the battery switch can lead to several hazards. Connecting the batteries incorrectly can cause sparks, potentially igniting flammable materials near the batteries. This is especially dangerous in enclosed spaces like the undercarriage of your travel trailer. Furthermore, accidentally short-circuiting the batteries by touching the terminals with a conductive object can result in severe burns and potentially even explosions.
Leaving the switch in the wrong position could drain your batteries unexpectedly, leaving you without power when you need it most. Finally, incorrect wiring or connections can lead to overheating, which can damage components or start a fire.
Importance of Proper Grounding and Bonding
Proper grounding and bonding are critical for safety and preventing electrical shocks. Grounding connects the electrical system to the earth, providing a path for stray currents to dissipate safely. Bonding connects various metal parts of the trailer together, ensuring they are at the same electrical potential and preventing voltage differences that could cause shocks. A poorly grounded system can lead to dangerous voltage buildup on metal surfaces, creating a risk of shock when you touch them.
Similarly, inadequate bonding can result in stray currents flowing through the trailer’s metal frame, potentially causing fires or damage to electrical components.
Preventing Electrical Shocks and Fires
Several best practices significantly reduce the risk of electrical shocks and fires. Always disconnect the negative battery terminal before working on any part of the electrical system. This is a crucial safety precaution that breaks the circuit, preventing accidental shocks. Wear appropriate personal protective equipment (PPE), including insulated gloves and safety glasses, when working with batteries or electrical components.
Inspect all wiring and connections regularly for signs of damage or corrosion. Replace any damaged or corroded components immediately. Never work on the electrical system in wet or damp conditions, as water is a conductor of electricity and increases the risk of shock. Keep the battery area clean and well-ventilated to prevent the buildup of flammable gases.
Safe Working Practices Around Batteries and Electrical Systems
The following illustration depicts safe working practices:
Imagine a drawing showing a person wearing safety glasses and insulated gloves while working on a battery in a well-ventilated area. The negative terminal is disconnected. A clearly marked warning symbol, a universally recognized symbol for high voltage, is placed prominently near the battery. Another symbol, depicting a flame within a circle with a slash through it, indicates the risk of fire.
A third symbol, showing a person touching a high-voltage symbol with a slash through it, depicts the danger of electrical shock. The ground is dry and the area is free of flammable materials. The person is using insulated tools. The overall scene conveys a sense of caution and preparedness.
Mastering your travel trailer’s battery switch is key to a smooth and worry-free RV experience. By understanding its function, performing regular maintenance, and knowing how to troubleshoot common issues, you’ll keep your power flowing and your adventures uninterrupted. Remember, safety is paramount – always prioritize safe practices when working with batteries and electrical systems. Happy travels!
Essential FAQs
What happens if I leave my battery switch on all the time?
Leaving your battery switch on constantly can drain your batteries, especially if you have parasitic draws (small electrical loads even when things are off). It’s best to turn it off when not using the trailer for extended periods.
How often should I clean my battery terminals?
Clean your battery terminals at least twice a year, or more often if you notice corrosion. This helps maintain a good connection and prevents voltage loss.
Can I use a battery switch with lithium batteries?
Some battery switches are compatible with lithium batteries, but others aren’t. Check your switch’s specifications and consult your battery manufacturer’s instructions to ensure compatibility.
My battery switch is making a clicking noise. What’s wrong?
A clicking noise usually indicates a faulty switch or a low battery voltage. Check your battery voltage and the switch itself for any damage. If the problem persists, you might need a replacement.
